API Gateway 로 Kinesis 를 위한 HTTP Proxy 만들기
AppsFlyer 라는 SaaS 서비스의 데이터를 받아와서 분석에 사용하고 싶습니다. AppsFlyer 는 Event 가 발생할 때 마다 사용자가 등록한 HTTP Endpoint 로 데이터를 쏴주는 Push API 라는 기능을 제공합니다. 그러니 HTTP Endpoint 를 만들어 요청을 받은 뒤 Kinesis Data Stream 에 넣고 S3 로 떨구기도 하는 등 후속 처리하면 되겠습니다. 찾아보니 API Gateway 를 Kinesis Proxy 로 사용할 수 있어 관련 내용을 정리해봤습니다.
Tutorial: Create a REST API as an Amazon Kinesis proxy in API Gateway 문서를 많이 참고했습니다.
사전 준비 : IAM Role 과 Kinesis Data Stream
본격적으로 API 를 만들기에 앞서 필요한 AWS Resource 들을 준비합니다. 데이터를 넣을 Kinesis Data Stream 과, API 가 Kinesis Data Stream 에 접근할 때 쓸 IAM Role 이 필요합니다.
Kinesis Data Stream
실습 목적이니 shard 1개로 생성합니다. 응답의 ARN 은 기록해뒀다가 이어서 IAM Policy 를 생성할 때 사용합니다.
aws kinesis create-stream \
    --stream-name api-gateway-kinesis-proxy \
    --shard-count 1
IAM Role
API Gateway 를 Trusted Entity 로 하여 IAM Role 을 생성합니다.
aws iam create-role \
    --role-name api-gateway-kinesis-proxy \
    --assume-role-policy-document '{
        "Version": "2012-10-17",
        "Statement": [
            {
                "Effect": "Allow",
                "Principal": {
                    "Service": "apigateway.amazonaws.com"
                },
                "Action": "sts:AssumeRole"
            }
        ]
    }'
앞서 만든 Kinesis Data Stream 에 Put Record 를 허용하는 IAM Policy 를 생성합니다. 응답의 ARN 은 기록해뒀다가 바로 이어서 사용합니다.
aws iam create-policy \
    --policy-name api-gateway-kinesis-proxy \
    --policy-document '{
        "Version": "2012-10-17",
        "Statement": [
            {
                "Effect": "Allow",
                "Action": [
                    "kinesis:PutRecord"
                ],
                "Resource": [
                    "<위에서 생성한 Kinesis Data Stream 의 ARN>"
                ]
            }
        ]
    }'
생성한 Policy 를 Role 에 Attach 합니다.
aws iam attach-role-policy \
    --policy-arn <바로 앞에서 생성한 IAM Policy 의 ARN> \
    --role-name api-gateway-kinesis-proxy
API 생성
API Gateway 는 3가지 종류의 API 를 지원합니다. REST API -> WebSocket API -> HTTP API 순으로 런칭되었습니다. WebSocket API 는 사용 목적이 명확히 구분되니 넘어가고, REST API 와 HTTP API 가 어떻게 다른지 처음에 의아했습니다.
Announcing HTTP APIs for Amazon API Gateway 글에서는 새로 나온 HTTP API 를 쓰면 평균 70% 의 비용 절감이 가능하고, HTTP API 가 Overhead 가 더 적어 성능 상 이점도 누릴 수 있다고 소개합니다. 기존에 사용자들이 REST API 를 쓰면서 피드백 준 부분들을 반영하여 HTTP API 를 새롭게 낸 느낌입니다.
다만 아무래도 최근에 나온 만큼 REST API 에서 제공하는 기능 중 HTTP API 에서는 아직 제공하지 않는 것들이 있습니다. Choosing between HTTP APIs and REST APIs 에서 REST API 와 HTTP API 의 기능 별 현황을 비교하여 볼 수 있습니다. Kinesis Data Stream 같은 AWS Service 를 연동하는 것도 아직은 REST API 에서만 가능하므로, REST API 를 생성합니다.
Endpoint Type 으로는 EDGE, REGIONAL, PRIVATE 이 가능한데, 각각을 어느 경우에 쓰면 좋은지 Choose an endpoint type to set up for an API Gateway API 문서에서 간단히 소개하고 있습니다. Appsflyer 서버의 요청만 처리하면 되므로 REGIONAL 을 선택합니다.
When a client running on an EC2 instance calls an API in the same region, or when an API is intended to serve a small number of clients with high demands, a regional API reduces connection overhead.
aws apigateway create-rest-api \
    --name KinesisProxy \
    --endpoint-configuration '{
        "types": ["REGIONAL"]
    }'
응답의 id 값은 기록해뒀다가 나중에 사용합니다.
API 가 생성될 때 / 경로의 resource 도 자동으로 만들어집니다. 이것도 나중에 필요하므로 resource id 값을 기록해둡니다.
aws apigateway get-resources \
    --rest-api-id <앞서 생성한 api 의 id>
Method 생성
/ 경로로 POST 요청을 받을 수 있도록 method 를 생성합니다.
aws apigateway put-method \
    --rest-api-id <앞서 생성한 api 의 id> \
    --resource-id <앞서 확인한 root resource 의 id> \
    --http-method POST \
    --authorization-type NONE
Integration Request 설정
/ 경로로 받은 POST 요청을 처리해서 Kinesis 에 Put 하도록 integration 을 설정합니다.
aws apigateway put-integration \
    --rest-api-id <앞서 생성한 api 의 id> \
    --resource-id <앞서 확인한 root resource 의 id> \
    --http-method POST \
    --type AWS \
    --integration-http-method POST \
    --uri arn:aws:apigateway:ap-northeast-2:kinesis:action/PutRecord \
    --credentials <앞서 생성한 iam role 의 arn> \
    --request-templates '{
        "application/json": "{\"StreamName\": \"api-gateway-kinesis-proxy\", \"Data\": \"$util.base64Encode($input.body)\", \"PartitionKey\": \"$context.requestId\"}"
    '} \
    --passthrough-behavior NEVER
다른 것들은 직관적인데, --request-templates 부분이 좀 낯섭니다. 이어서 조금 더 설명해보겠습니다.
Kinesis 의 PutRecord API 는 StreamName, Data, PartitionKey 3개 argument 를 필요로 합니다.
StreamName
앞서 생성한 data stream 의 이름을 (api-gateway-kinesis-proxy) hard-coding 합니다.
Data
Appsflyer 의 Push API 는 HTTP Request Body 에 Event 데이터를 JSON 으로 넣어 요청해줍니다. Push API V2.0 real-time attribution event reporting 문서의 Message structure and unique fields 에서 데이터 샘플을 확인할 수 있습니다. 그러므로 HTTP Request Body 를 Kinesis Data Stream 에 넣으면 됩니다.
이때 Kinesis 는 Data 가 base64 encoded 되어있음을 가정하므로 변환이 필요합니다. API Gateway 는 Velocity Template Language (VTL) 를 활용한 변환을 지원합니다. API Gateway mapping template and access logging variable reference 문서에서 어떤 것들이 가능한지 확인할 수 있습니다. 마침 $util 에 base64Encode 가 있으니 그걸 쓰면 되겠습니다.
PartitionKey
data stream 은 1개 이상의 shard 로 이뤄지는데, 적절히 랜덤한 partition key 를 사용하면 put 로드가 shard 에 골고루 분산되어 좋습니다.
stack overflow 의 비슷한 질문에 대한 답변 을 보면 $context.requestId 를 추천합니다. Using Amazon API Gateway as a proxy for DynamoDB 글에서도 dynamodb 테이블의 primary key 로 쓰는걸로 봐서, 랜덤값으로 쓰기에 적절해보입니다.
정리하면 아래와 같은 mapping template 이 됩니다. Content-Type : application/json 일때 이 mapping template 을 사용하도록 put-integration 때 --request-templates argument 를 준 것입니다.
{
  "StreamName": "api-gateway-kinesis-proxy",
  "Data": "$util.base64Encode($input.body)",
  "PartitionKey": "$context.requestId"
}
Integration Response 설정
Kinesis PutRecord 의 응답이 200 일때 Method Response 로 넘기도록 Integration Response 를 설정합니다. Appsflyer 쪽에는 200 code 만 지켜주면 되고 response body 는 신경 쓸 필요 없으므로 빈 응답을 내려주도록 --response-templates argument 를 줍니다.
aws apigateway put-integration-response \
    --rest-api-id <앞서 생성한 api 의 id> \
    --resource-id <앞서 확인한 root resource 의 id> \
    --http-method POST \
    --status-code 200 \
    --response-templates '{
        "application/json": ""
    '}
Method Response 설정
클라이언트 쪽에 내려줄 method response 를 설정합니다. 앞서 얘기한 것 처럼 Appsflyer 쪽에는 200 code 만 지켜주면 되고 response body 는 필요 없으니 Empty model 을 사용하도록 --response-models argument 를 줍니다.
aws apigateway put-method-response \
    --rest-api-id <앞서 생성한 api 의 id> \
    --resource-id <앞서 확인한 root resource 의 id> \
    --http-method POST \
    --status-code 200 \
    --response-models '{
        "application/json": "Empty"
    '}
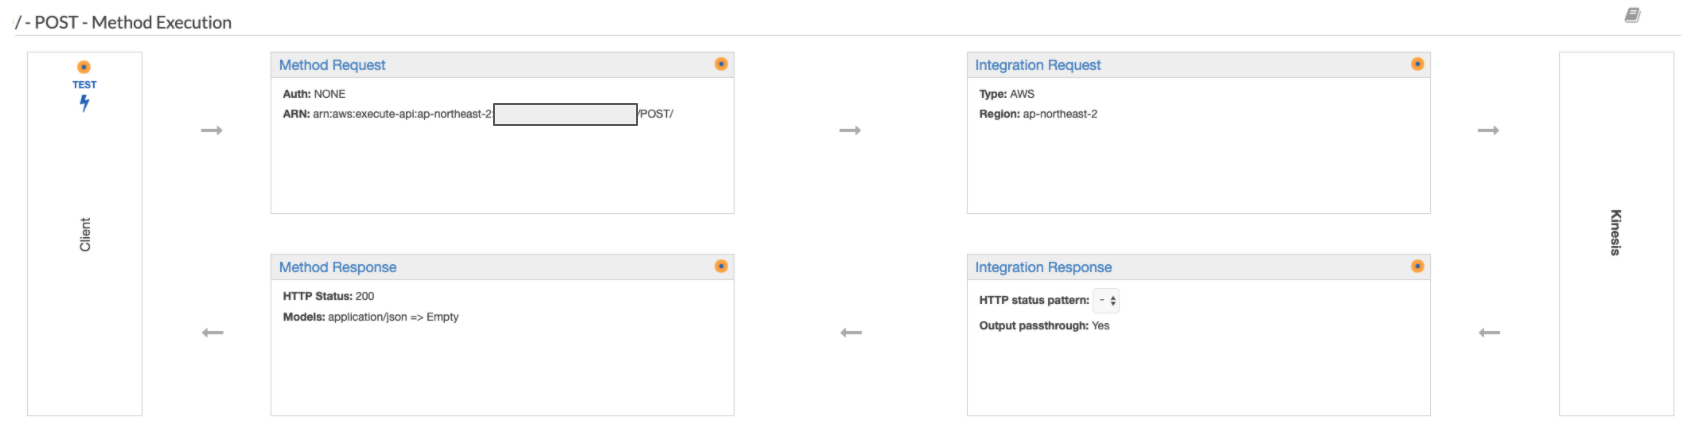
정리해보면 / resource 가 요청을 처리해서 응답을 내려주는 건 아래 diagram 처럼 됩니다.
Deploy
API 를 완성했으니 배포합니다. 현재 authroization 관련 아무런 설정을 안 했으므로, 배포된 API 는 누구나 호출할 수 있습니다. stage 이름은 적당히 production 정도로 해봅니다.
aws apigateway create-deployment \
    --rest-api-id <앞서 생성한 api 의 id> \
    --stage-name production
배포 후에는 invoke url 이 생깁니다. console 에서 확인하거나, Invoking a REST API in Amazon API Gateway 에서 소개하는 rest api 의 url format 을 가지고 추론할 수 있습니다.
테스트
cURL 로 앞서 확인한 invoke url 에 샘플 데이터를 담은 POST 요청을 보냅니다.
curl \
    -X POST \
    -H "Content-Type: application/json" \
    -d '{
    	"app_id": "com.sokoloff06.sdktest",
        "event_name": "af_cross_promotion",
        "event_time": "2020-05-10 00:57:26.038",
        "idfa": null,
        "advertising_id": "cb654aa6-8026-4633-bfd1-de619896fd6a"
    '} \
    https://<rest-api-id>.execute-api.ap-northeast-2.amazonaws.com/<stage-name>
응답으로 kinesis data stream 의 shard id 와 sequence number 가 내려오는 걸로 봐서 요청이 잘 처리된 것 같습니다.
{“SequenceNumber”:”xxxyyyzzz”,”ShardId”:”shardId-000000000000”}
aws cli 로 record 를 확인해봅니다. shard iterator type 을 AT_TIMESTAMP 로 하고, cURL 로 요청을 때리기 직전 시각을 epoch second 로 변환해서 --timestamp 로 주면 편리합니다.
aws kinesis get-shard-iterator \
    --stream-name api-gateway-kinesis-proxy \
    --shard-id shardId-000000000000 \
    --shard-iterator-type AT_TIMESTAMP \
    --timestamp 1589704220
응답으로 받은 shard iterator 를 가지고 get-records 를 호출해서 응답을 확인합니다.
aws kinesis get-records \
    --shard-iterator <앞서 확인한 shard iterator>
{
    "Records": [
        {
            "SequenceNumber": "...",
            "ApproximateArrivalTimestamp": "2020-05-10T17:31:12.575000+09:00",
            "Data": "ewogICAgICAgICJhcHBfaWQiOiAiY29tLnNva29sb2ZmMDYuc2RrdGVzdCIsCiAgICAgICJldmVudF9uYW1lIjogImFmX2Nyb3NzX3Byb21vdGlvbiIsCiAgICAgICJldmVudF90aW1lIjogIjIwMjAtMDUtMTAgMDA6NTc6MjYuMDM4IiwKICAgICAgImlkZmEiOiBudWxsLAogICAgICAiYWR2ZXJ0aXNpbmdfaWQiOiAiY2I2NTRhYTYtODAyNi00NjMzLWJmZDEtZGU2MTk4OTZmZDZhIgogICAgfQ==",
            "PartitionKey": "..."
        }
    ],
    "NextShardIterator": "...",
    "MillisBehindLatest": 197000
}
base64 encode 된 Data 를 확인할 수 있습니다. Decode from Base64 format 같은 웹 페이지에서 base64 decode 해보면 cURL 요청에 실었던 샘플 데이터임을 확인할 수 있습니다.
{
    "app_id": "com.sokoloff06.sdktest",
    "event_name": "af_cross_promotion",
    "event_time": "2020-05-10 00:57:26.038",
    "idfa": null,
    "advertising_id": "cb654aa6-8026-4633-bfd1-de619896fd6a"
}
더하여 : IP Whitelisting
authroization 관련 아무런 설정을 안 했으므로, 배포된 API 는 누구나 호출할 수 있다고 앞에서 얘기했습니다. 이렇게 public 하게 개방하기보다 적절히 authorization 을 설정하고 싶을 수 있습니다. Appsflyer 에서도 Push API 를 받아줄 Endpoint 를 개발할 때 IP Whitelisting 하기를 권장하며 IP 주소 목록을 문서로 공유하고 있습니다.
API Gateway 에서는 Resource Policy 로 특정 IP 주소/대역을 허용하거나 거부할 수 있습니다. How do I use a resource policy to whitelist certain IP addresses to access my API Gateway API? 문서를 참고하면 좋습니다.
{
    "Version": "2012-10-17",
    "Statement": [
        {
            "Effect": "Allow",
            "Principal": "*",
            "Action": "execute-api:Invoke",
            "Resource": "arn:aws:execute-api:ap-northeast-2:<aws-account-id>:<rest-api-id>/*/*/*",
            "Condition": {
                "IpAddress": {
                    "aws:SourceIp": ["10.0.0.0/8", "192.168.0.0/16", "172.16.0.1/32"]
                }
            }
        }
    ]
}
허용되지 않은 IP 주소/대역에서 invoke url 에 http 요청을 보낼 경우, 403 Forbidden 응답을 받게 됩니다.
마치며
처음에는 Appsflyer 데이터를 받아오기 위해 알아보기 시작했는데, 일반적인 로그 수집 HTTP Endpoint 를 만들 때에도 쓰기 좋겠다는 생각이 들었습니다. API Gateway 하면 막연히 Lambda 에 HTTP Endpoint 붙일 때 쓰는 무언가 정도로만 인식하고 있었는데, VTL 등 간단한 변환들은 API Gateway 단에서 처리 가능하다는게 매력적이었습니다.
이번 글에서는 다루지 않았지만 CloudWatch / Firehose 에 연동한 Monitoring 과 Logging, X-Ray 에 연동한 Tracing 등 API 개발에 중요한 요소들을 다른 AWS Service 에 연동하여 간편하게 구현할 수 있게 해주는 데, 그런 것들도 더 알아보고 싶어지네요.
레퍼런스
- Announcing HTTP APIs for Amazon API Gateway
- Choosing between HTTP APIs and REST APIs
- Choose an endpoint type to set up for an API Gateway API
- Tutorial: Create a REST API as an Amazon Kinesis proxy in API Gateway
- Appsflyer : Message structure and unique fields
- Velocity Template Language (VTL)
- API Gateway mapping template and access logging variable reference
- How to add functions like generating random UUID in velocity template for request/response mapping in API gateway
- Using Amazon API Gateway as a proxy for DynamoDB
- Invoking a REST API in Amazon API Gateway
- AppsFlyer IP address ranges